In winter, there is less sunshine and moonlight and more cloudy days, so it is difficult for drivers to see the road ahead. The glare increased by other cars through the windshield is one of the most concerned problems of every owner or driver. Headlamp glare is one of the main causes of night crash.
At any time of the year, you must keep your headlights, windshield and exterior glass as clean as possible with a little extra effort. You will get cleaning services at any cleaning station, but you can also do some DIY processes at home to start cleaning.
Start by checking your headlight, whether it's faded, cloudy or bright? Yellow light will reduce your eyesight and need to be restored. If your headlights are yellow, please repair them as soon as possible. Worn, muddy and yellowing headlights reduce the light output and redirect the lights, which pose a danger to yourself and other drivers.
With the increasing number of kits for headlight repair products, you can now do it yourself. Remember, headlamp glare is a big problem today. Please follow some simple tips; You can easily solve problems and reduce the risk of crashes during the day or night.
Causes of yellowing or oxidation of headlights
Oxidation yellowing of headlights is a big problem. It is difficult to clean and maintain a new state. The best way is to not only clean them, but also repair them with DIY headlight repair kit, or you can call a professional to complete the task and get the best service. To clean them, just make sure you have a complete understanding of the materials that make them and why they change color.
There are some important things, which is why the headlights change color:
1. The headlights are now made of polycarbonate plastic instead of glass. These types of materials are very hard but porous. So they need to be sealed.
2. The debris on the road is basically small stones, pebbles and sand, and keeps driving at a high speed of 30 to 80 mph, just like the sand blaster on the headlights of a car. Now, the debris will eventually remove the sealant from the car's headlights by forming small cracks and dents. Then cracks and dents begin to collect all the dirt and dirt around.
3. The sun's ultraviolet rays, acid rain and acid in the stomach of some insects will erode the sealant on the headlights like cancer.
Before you know that your car's crystal clear headlights become muddy, foggy and oxidized, please start to take good care of them, because if they are too dirty, it is difficult to clean or repair them.
Solutions for headlight repair or cleaning
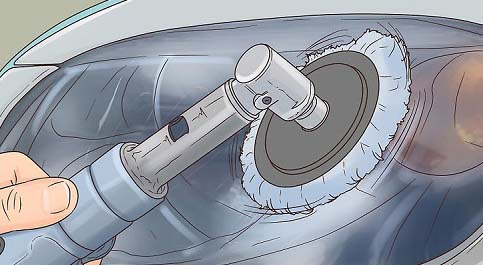
If you know why the headlights are fogging, you can now restore them through a simple process. First, clean them and then sell them for lasting results. The most effective processes are wet grinding, polishing and sealing. High quality headlight repair kits can also be used.
1. First of all, you need to cover or paste the Yellow headlamp to protect it from the influence of car painting.
2. Start polishing the car lens with 1000 mesh sandpaper, and then move to 1500 mesh sandpaper, gradually to 2000 mesh. When polishing, use a spray bottle filled with water to keep the headlights on the surface moist or you can use the garden hose, but it is slow.
3. Now clean the headlamp with clean water, and then polish the headlamp with the water-soluble polishing agent you choose from the market.
4. Allow them to dry completely before the final or sealing process. You can even use a hair dryer to make sure there is no moisture, because a drop of water will destroy the whole finish. Now finally, seal the car's headlights with high-quality polymer sealant. The quality of the sealer will determine how long you can maintain the new look of the headlights.
Another DIY process for cleaning light yellow headlights
You only need a few things to complete the cleaning process, car polish, glass cleaner, plastic gloves, water and soft cloth.
Just add toothpaste to your list to start your best DIY process.
1. First, wash the headlights with water and toothpaste and soap. You can use a rag filled with toothpaste to clean and use it back and forth. Let stand for a few minutes, then rinse with water and dry.
2. Now wash the headlight with soapy water and the surrounding area with soapy water. Dry thoroughly.
3. Don't forget to use masking tape around the headlamp. This process is mandatory to protect the paint on your car.
4. First, remove the large lampshade and clean it with white vinegar. Give it a vinegar bath and keep it in vinegar for at least an hour. The acid of vinegar will loosen all dirt. After one hour, wipe with a dry and soft cloth or sponge to remove all dirt, and finally reinstall the headlamp cover.
5. If the headlights are covered with scratches, the vinegar bath can restore the showroom quality of your headlights. Spray the cooking spray after the vinegar bath and drying method to get clean and shiny headlights.
6. Another good choice is denatured alcohol. First, wash the car headlights with soapy water. Take a soft rag and dip it into a corner of denatured alcohol. Gently wipe the car lens with a rag. Rinse properly and let it dry completely.

